Brisket is a cut of meat from the chest or breast of beef or veal. It is challenging, fatty meat that requires long, slow cooking to become tender. The brisket is trimmed by removing most of the fat and gristle from the surface of the meat.
To trim a brisket, first, remove the excess fat from the top and bottom of the meat. Then, cut off any large chunks of fat or sinew that are visible on the surface of the brisket. Finally, trim the ends of the meat to be even and square.
If the brisket is not trimmed correctly, it will cook unevenly, which will result in dry spots and burnt edges. When the brisket is trimmed adequately before cooking, it directly impacts how well it will cook.
An incredibly crucial part of preparing the brisket for cooking is to make sure it is properly cut. If you trim the brisket very well, it could profoundly impact the way your brisket is cooked and the quality of the slices you serve.
In order to achieve succulent results, the brisket must be appropriately trimmed before grilling. In addition, there are a few helpful hints that you will find below.
How Do You Cook Smoked Beef Brisket?Anatomy Of Brisket
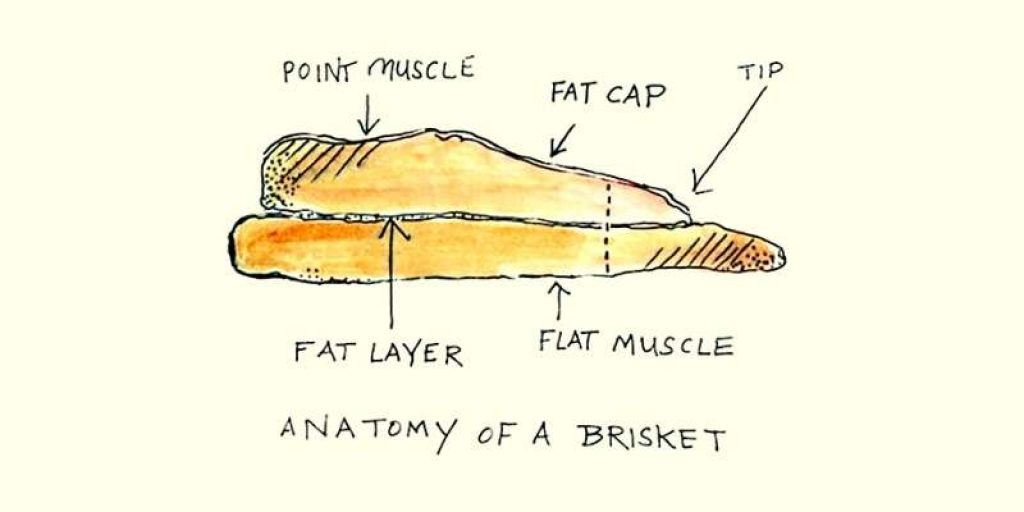
The brisket is a cut of meat from the chest of beef cattle. It is a tough cut of meat best suited for slow cooking methods such as braising or barbecuing.
The brisket has a lot of connective tissue, making it difficult to chew. However, when cooked slow and low, the connective tissue breaks down, making the meat tender and juicy. Moreover, The muscle fiber in the brisket is long and sinewy, making it a challenging cut to cook perfectly.
There are two parts to a brisket: the point and the flat.
A flat brisket is prepared from the brisket cuts, while a point brisket is prepared from burnt ends. Finally, a thick layer of fat binds these two parts together, discarded after smoking.
There is a lot of “Hard Fat” on top of the brisket. Therefore, spices used in rubs will not be able to penetrate a rigid fat barrier when cooking.
Trimming begins with removing all of the stubborn fat. “Soft fat” is another layer of fat found on the bottom of your brisket. This layer will enhance the flavor of the brisket and burnt ends, but it may also require trimming.
The Types Of Brisket Trim
Trimming a brisket can be done in three different ways.
This trimming method is best suited for use at home, aiming to maximize yield. But, for the price we paid, we’d like to consume as much of the Brisket as possible.
This type of trimming is used in restaurants, where yield is a primary concern, but consistency is also considered. Every day, a restaurant needs to cook multiple briskets simultaneously for their customers. As a result, trimming them can be a little more precise to keep them the same size. Of course, quality matters, but so does quantity in making a profit.
This is the most aggressive trimming style for use in competition. Competitors require that the brisket slices and the burnt ends fit into a 9″ square hand-in container. For the most part, the flat and point muscles are separated then trimmed to account for the muscles’ natural shrinkage during cooking. When it comes to trimming for competition, quality is more important than quantity.
Cutting your Brisket at home is the primary focus of this tutorial.
Tips For Selecting A Brisket
Tips for Selecting a Brisket
Grades of Beef
In the United States, Meat is graded by the Department of Agriculture (USDA). Various government agencies in other countries perform a similar function.
Generally, you’ll find only the top four grades of meat at your local grocery store, though the USDA might award eight grades. The three top grades are Prime, Choice, and Select.
The juicy stuff is in prime position. A high-end restaurant serves this food, and it’s what you want to buy to get the highest quality. Premium cuts of beef come with well-marbled meat and good color.
The brisket has been smoked for so long that you need to choose a quality cut that can withstand all that heat.
Size Matters
It may appeal to your inner caveman (or woman) to prepare, smoke, and serve a 15-pound slab of meat, but pick a cut that suits your needs.
Keep in mind how many people you are feeding and the size of your grill.
The Skinny on Fat
Fat equals flavor and moisture, as we know from other cuts of beef. While logic would lead you to believe that less fat means better meat, the reality is sometimes the exact opposite.
While cooking, fat marbled throughout the meat helps keep it tender. Since briskets cook for hours, it makes sense to have as much moisture as possible!
As the cap melts, it ensures moisture and flavor while cooking.
A Sharp Ending
A well-prepared brisket should be a meal that a host is proud to present to guests. Many people are comfortable grilling, but when you serve them this beauty, they will awe your barbecue skills!
You can smoke a brisket and serve it to your family or guests as a delicious treat. Lettuce wraps make excellent sandwich fillings.
Don’t be discouraged if your first attempt doesn’t yield a competition-worthy product. It takes a short while to learn how to choose and trim a brisket.
5 Simple Tips To Choose A Brisket
- If you’re a novice cook, you don’t need to buy Wagyu brisket from Costco, Sams Club, or your butcher.
- Brisket made from American Wagyu results in juicy, tender meat.
- From 9 lbs To 20 lbs And up to a high level of dependability
- The leaner part of the brisket will cook at nearly the same rate as its fattier counterpart if you choose a brisket with plenty of marbling and a thick flat.
- Make sure you’re getting Certified Angus Beef or USDA Choice.
Trimming A Brisket
You don’t have to lose weight to trim. But, first, you should consider the brisket’s shape. As a final step, remove the small, thin corner pieces of the flat muscle that are likely to dry out and mold into an oval. This allows the meat to be surrounded by heat and smoke.
However, it is impossible to add it back on. As a result, trimming the brisket is a must if you want a perfectly smoked beef brisket. Brisket trimming is an essential part of the process, and this detailed guide will walk you through the process step-by-step.
Safety First
When it comes to brisket trimming, it’s imperative to remember a few basic safety precautions. Because of the knife’s sharpness and the unnatural cutting angles, it’s easy to let your guard down and put yourself in danger.
Remember to keep the blade away from your body at all times. Avoid getting caught on a challenging piece of fat while cutting to avoid getting slashed when you follow through with force. If you make sure you stroke your slices with the blade going away from you 99 percent of the time, you won’t have a problem
I’d also consider wearing kitchen or BBQ gloves to reduce the risk of slicing fingers or hands. It’s comforting to know that you’re covered should the unthinkable happen.
Hot And Fast Brisket On Pellet Grill5 Common Tools You Need To Trim A Brisket
- Brisket
- Boning Knife/Chef’s Knife
- Cutting Board
- Trash Bowl
- Patience
Directions to slice a perfect Brisket
Step 1: Pick your brisket.
Begin by selecting a brisket. As long as it can handle the heat, you don’t want a large brisket that won’t fit in your oven. Briskets weighing 15 to 17 pounds are ideal. Also, look for a piece of brisket that has the maximum fat marbling. Make no apologies for picking up the brisket to examine it further or even asking if the meat department can bring you more briskets to inspect.
Step 2: Choose Your Knife and Rinse Brisket
Remove the brisket from its packaging the night before you intend to cook it, thoroughly rinse it, and allow it to air dry. A knife will be required for trimming. Any other type of knife is not recommended; a boning knife is. These knives can be used for fat trimming, but the middle knife is most suitable for making flat trimming cuts.
Step 3: Plan Your Cuts
Place the brisket fat-side up on a cutting board. Begin on the flat side and work your way up to the pointed end. The brisket has a variety of fats, as you’ll see when you cut into it. A small portion of it resembles leather skin texture, while most are more delicate and waxy. Unfortunately, it is impossible to break down the first two types of fat.
That’s worth repeating.
No matter how long you cook them, the large hunks of fat will never be anything but a mouthful of fat. Your brisket will take longer to cook if you don’t remove the fat from the brisket before cooking. More mass means it will take more time to heat up and reach the desired temperature inside the container.
Step 4: Start trimming.
Cutting very shallowly with the blade almost perpendicularly to the brisket, begin by cutting long enough so that the fat can be held by your left hand while you continue to trim by holding it with your right hand.
Roll up the fat from the flat side toward the point side. Accidental cuts in the meat are to be expected. As shallow as possible with your strokes is all that’s required.
It’s also worth noting that the fat left on the lower abdomen is delicate. Generally, if you don’t want to trim the brisket as close as the image shows, you can leave about 14 inches of fat on it. However, remember that seasoning and smoke will only penetrate about 14 of an inch. As a result, if you want more flavor in your brisket, you’ll have to trim it pretty close. Toss the trimmings into the trash as you go.
Step 5: Remove the Surface Fat
Slowly work your way up the needle, starting at the flat end and working to the point. A thick layer of waxy fat will coat the tip. Don’t rush the process; instead, be patient and deliberate. It should look like this when you’re done cooking your brisket.
Look at your brisket’s flat and point ends to find out where the grain is located. By cutting your brisket across the grain (as indicated by the black annotations), you’ll be able to achieve the most tender slices. Additionally, you’ll notice that the grain of the point and the flat is not the same, which is a problem. This is why the point and flat are usually separated after cooking.
Step 6: Cut Out the Point End Fat
After removing all of the fat from the fat side, turn your attention to one more area. The brisket is separated into two distinct sections by a large fat chunk (circled in black in the illustration below).
Try to get rid of as much of it as possible. You’ll need a longer-bladed boning knife for this job because you’ll be making a lot of very vertical cuts. That’s what you’ll see in the following images.
Step 7: Pause to Admire Your Work
Before you turn the brisket over and begin working on the other side, consider how much more evenly the brisket will cook now that the inedible fat has been removed.
Step 8: Turn & Repeat
Work on the “meat” side of the brisket after flipping it over. You’ll notice that there isn’t any extra fat or skin to be removed. Another mass of fat must be excised similarly to the one removed on the other side. Dissect this chunk of fat using the same deep cuts. Avoid cutting through the fat and separating the rounded points by accident. You can’t get it wrong if you drive slowly.
Step 9: Get Ready to Season Your Brisket
This fat removal process has reduced the cooking time by 4 to 6 hours, depending on the final cooking temperature. Your seasoning and rub will not penetrate the fat if it is present.
Step 10: Discard Excess Fat
If you make your own sausage, you can grind up the excess fat and season it. Otherwise, it’s a complete waste of time.
Benefits of a Trimmed Brisket
Trimming and shaping your entire brisket will help it cook more evenly than leaving it untrimmed.
By removing excess fat from the fat cap, you will be able to enhance the bark of the brisket.
The dense fat on top of the pointcut does not render out when smoked.
Flat and pointcuts can be separated more efficiently during smoking or cutting off your trimmed brisket.
A trimmed brisket is more visually appealing.
Can You Separate The Brisket?
Two muscles, known as the flat and the deckle, make up a whole packer brisket, commonly referred to as the point.
The point muscle is the critical ingredient for brisket burnt ends.
The dense fat surrounding the point muscle needs to be removed because it is too dense to break down. Unlike the softer outer fat that many people like to keep on a brisket, this fat is tougher to remove.
If you wanted to separate the flat and point muscles and cook them separately like done in a BBQ competition, you could do so by cutting a sizeable fat vein through them. Then, follow the fat seam with your trimming knife and trim away any extra after separating it.
Slice the flat into slices, and you’ll be left with the point for a burnt end.
How To Smoke A Brisket On A Pellet Grill?What Happens When You Skip Trimming?
Two muscles, known as the flat and the deckle, make up a whole packer brisket, commonly referred to as the point.
The point muscle is the critical ingredient for brisket burnt ends.
The dense fat surrounding the point muscle needs to be removed because it is too dense to break down. Unlike the softer outer fat that many people like to keep on a brisket, this fat is tougher to remove.
If you wanted to separate the flat and point muscles and cook them separately like done in a BBQ competition, you could do so by cutting a sizeable fat vein through them. Then, follow the fat seam with your trimming knife and trim away any extra after separating it.
Slice the flat into slices, and you’ll be left with the point for a burnt end.
What Happens When You Skip Trimming?
No offense is meant by smoking an untrimmed brisket; it’s just that you’ll get a less appealing cut that cooks unevenly.
As you break down and slice your meat, you’ll discard quite a bit of unrendered fat and sinew. Unfortunately, those fatty, chewy bits you discard won’t sit well with your guests.
However, if you don’t trim your smoked brisket, there are other consequences.
Those who have cooked with wood smoke know that their food doesn’t get very flavorful. This is because that delicious combination of crispy flesh and buttery fat that makes meat bark so irresistible is created instead of when smoke particles “stick” to the cut surfaces of your meat.
What will happen in the smoker if your untrimmed brisket has an inch or more fat covering the meat? Because of the thick fat cap, your meat won’t develop a flavorful bark.
The fat cap is a waste of all that smoke flavor. Your guests will have to chew through unrendered fat to get any smoky flavor. The flavor of the meat is locked up in the fat, so removing it will result in a bland and lifeless cut.
Trimming and shaping your entire brisket is worth the extra 10 to 20 minutes of work. However, you cannot skip this step to make a top-class brisket.
How To Trim A Brisket For BBQ Competition?
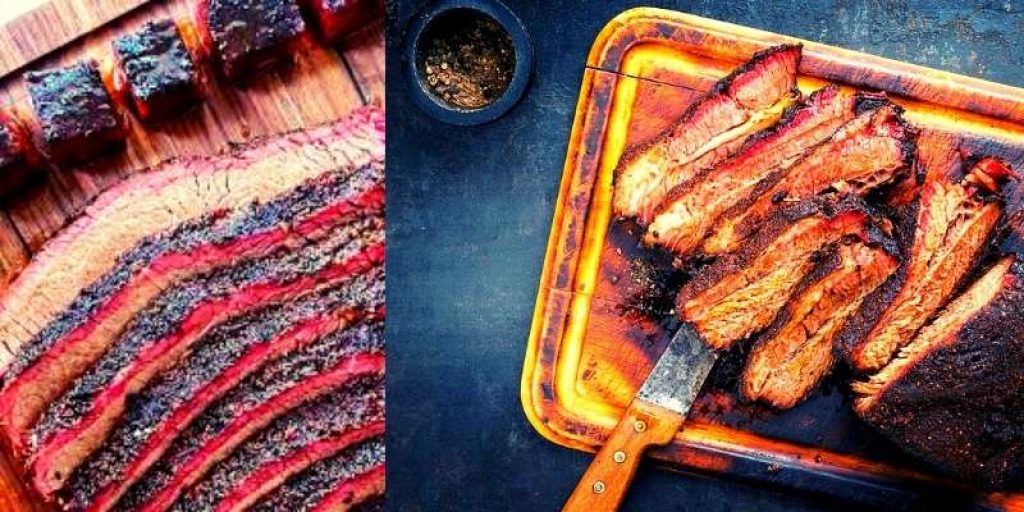
The brisket trimming method is quite aggressive. It is designed specifically for BBQ competitions where perfection is essential. When cooking for friends and family, you can follow these steps to end up with a delicious brisket.
The meat’s thickness should be taken into account. Briskets with uniform thickness are what you need. The resulting cuts will be neat and thick.
Look for briskets with the grain oriented vertically towards the flat. By doing so, you will reduce the need for later shaping.
Test the stiffness of the brisket by holding it in one hand. Ideally, it should be stiff in the middle since this indicates it has been wet-aged for some time. You don’t want it to be extremely weak, either.
Start by rinsing your brisket to get rid of excess liquids.
The next step is to cut off the front to determine where to start slicing. In addition to removing gray (aged) meat, consider the size of your box when you square off the brisket.
Make sure you get rid of any large chunks of fat and get your burned ends to where you want them.
You should remove the silver skin from the meat after you have removed most of the fat.
Should You Trim Your Brisket?
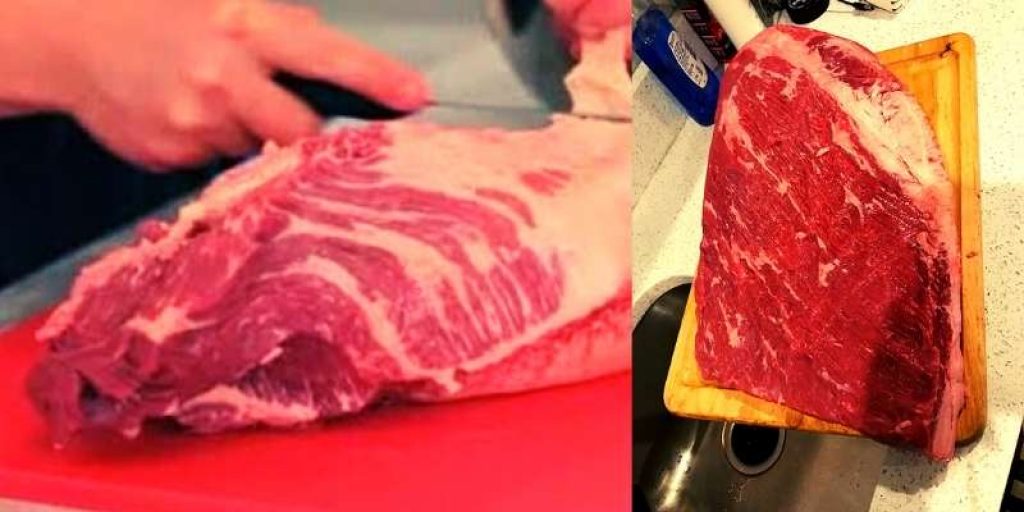
You may be tempted to skip the trimming step in favor of slathering on a dry rub after gazing at your entire brisket. But, considering that you’ll be smoking a slab of meat for 12 to 20 hours, does trimming matter?
A flat or point cut purchased separately is less likely to require trimming than a whole brisket being smoked. In most cases, these brisket pieces have already been trimmed and only need to be cleaned up a little bit more.
Trimming a whole brisket, on the other hand, is a different story. Brisket purchased directly from a butcher may have been pre-processed for the customer’s convenience. You may need to trim your frozen brisket if you buy it from the grocery store in a large package.
A brisket that has not been trimmed has a great deal of fat and fibrous connective tissue. While some of this fat and cartilage will be melted and converted to collagen in your smoker, most of it will remain there. There are layers of these inedible bits streaked through your brisket meat.
Removes excess fat and connective tissue that doesn’t taste pleasant when cooked; trimming the brisket removes it. Since smoke doesn’t penetrate very far, removing this layer of fat aids the development of flavor in the meat.
The shape of your brisket also needs to be taken into consideration. The flat end of the brisket is much thinner than the point (see Parts of Brisket below). Therefore, trimming your brisket will result in a more uniform cut, making smoking easier.
Trimmed brisket cooks more evenly, resulting in a superior product in terms of taste and texture.
How To Trim A Brisket For The Best And Tastiest Results?
The right way to smoke a brisket requires patience, time, and finesse.
Perhaps the most overlooked step in the brisket process is trimming. However, knowing how to trim a brisket properly can distinguish between glory and failure.
When you’re willing to spend the time, money, and energy on smoking a brisket, you might as well start right with a solid trimming job!
How to Know Your Brisket is Finished?
USDA recommends that beef be cooked to an internal temperature of 145°F. However, there is a significant difference between “done” and “finished.”
Despite its toughness, the brisket does need lots of time on the smoker at low heat to break down connective tissues, render fat, and tenderize the meat.
Brisketeers would almost unanimously agree that the internal temperature of the meat should be between 190°F and 205°F when it is “finished.” Even Aaron Franklin himself has his brisket removed from the smoker at 203°F.
So how do you keep a brisket flat moist?
You start with the meat’s grain on top, where the fat lies, and pull out any thick parts, which can be challenging to find. You’ll also want to take care of the area where the brisket connects to the leg and shank (think of it as a thick, rounded-off S-shape).
There should be a thick seam slicing across the meat, and you’ll need to trim this area with a sharp knife to make it thinner and flatten out.
What Is the Most Effective Wood for Smoking Brisket?
The most suitable wood to smoke Brisket is hickory. It has a sweet flavor that works wonderfully with barbecue. If you want to use something else, try apple or cherry wood.
You should avoid mesquite because of its strong flavor. You can also use oak if it’s available, but do not use maple for brisket because it has a bitter taste.
How long to cook a brisket?
Experienced pitmasters will tell you to cook the brisket until it probes easily when you ask how long to cook it. Several factors affect the cooking time of two similar-sized briskets.
However, none of this can help you if you need to prepare for a dinner party by 6:00 pm. It takes approximately 1 hour and 15 minutes per pound (0.45kg) of brisket to cook at 250°F (120°C).
The cooking time for a 10lb brisket at 250°F is 12.5 hours x 1.25 hours. If you’re pressed for time, brisket can also be cooked hot and fast, and you can finish it in less time.
Conclusion
Trimming briskets is not a particularly difficult process, but it does require some attention to detail. With the above-mentioned simple steps, you can create a beautifully crafted and delicious brisket that will impress your family and friends.
A successful result begins with preparation, and the most significant component of properly preparing this cut of beef is knowing how to trim a brisket.
How To Smoke Perfect Brisket


